Point of Sale Overview
The order entry systems of EBMS combined with the data supplied by the integrated eCatalogs creates a powerful point-of-sale system. The software is designed to supply parts information for a large number of items. The EBMS software includes a customer
record that conveniently lists the customer contact information, terms, invoices, quotes, serialized items (which can be used to track vehicles), work orders, and annual history. The POS system tracks inventory, terms, sales and excise tax, accounts
receivable, sales history, and profits. The EBMS software also contains many work order, purchasing, delivery / shipping, and accounting tools.
The user should review the Sales > Sales Orders section of the sales documentation before continuing with the following information,
if the user is inexperienced with the order entry system of EBMS.
Sales Order Entry
Many of the functions within the Sales Order dialog depend on the eKeystone interface or the WHI Solutions eCatalog. These functions will be identified within the following documentation. Complete the following
steps to use the POS tools:
-
Select
Sales > Invoices and SOs from the main EBMS menu to open the following dialog:
-
Enter the customer ID number such as the phone number or other ID. The customer can be selected by clicking on the lookup button to the right of the Customer ID entry or by typing in the ID code. The customer can also be defaulted to a generic cash
customer’s ID (or blank) by checking and populating the Default sales customer to: option. Review the following sections for more details on creating and managing customers:
-
Sales > Customers > Adding a New Customer section of the sales documentation for more details on adding new customers.
-
Standard Features > Creating Ids section of the main documentation for more details on automatically creating a customer ID.
-
Sales > Miscellaneous Customers section of the sales documentation for more details on creating miscellaneous customers.
A miscellaneous customer is used if the customer information is not required on the sale.
-
Enter the customer's vehicle information within the No tab on the upper right corner of the sales order dialog. Enter the customer's vehicle VIN number to activate the VIN decoder. Review [Inventory] Serialized Items > Vehicle Identification Number (VIN) Decoding for details on this convenient tool.
-
Enter the optional Miles/Hrs value of the vehicle at the time of service. This value will be stored on the individual sales orders to maintain a
mileage/hours value.
-
Press the tab key to move to the next option or use the mouse or tab key to position the salesperson entry. Enter the salesperson ID or name. Tip: Specific fields can be set to read only so the tab key ignores user selected entry fields. For example,
the terms or other invoice header fields can be set to read only so the user does not need to tab through these field each time. Review the Getting Started > Security > Setting Security for a Tab, Entry Field, Button or Process within the main documentation for more details on setting entry fields as read only. The
Sales person entry located on the sales order screen has a number of options. Review the following steps to set up the sales person entry options:
-
The sales person entry can be set by the login user, by the customer, or manually by the salesperson at the time of the sale.
-
Open the following invoice options by selecting
Sales > Options from the main EBMS menu and selecting the
Invoices and S.O.s tab. If the
Default sales person to user name option is enabled, the system will copy the login user name to the salesperson field. Disable this option to keep the sales person field blank. Keep the salesperson ID found within the
terms tab of the customer record blank to manually enter the salesperson code at the time of sale.
Additional Columns
The automotive module adds the following additional columns to the detail lines of the sales order:
-
Manufacturer - this non-edit column displays the manufacturer setting. Review the Product Catalog > Manufacturer Settings section of the Inventory documentation for more details on the manufacturer setting.
-
List Price - shows the pricing within the list price level. Note that this price is not stored in the sales order and will always reflect the current price shown within the inventory item. Review the Pricing > Price Levels section for more details.
-
Regular Price - the regular price is based on the View Level setting in the Inventory Options > Price Levels tab. If the View Level setting is set to (none), as shown below, the regular price will reflect the customers price level setting. Review the Sales > Customers > Changing Customer Information section of the sales documentation section for more details.
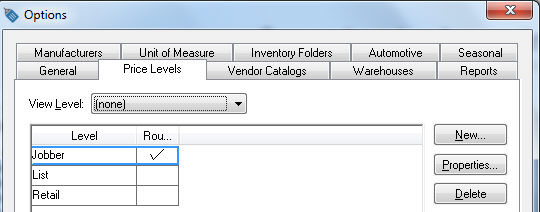
Note that the View Level setting is a MS Windows registry setting which must be set for each computer.
eCatalog Lookup Options
The automotive module adds the following additional eKeystone and WHI Solutions functions:
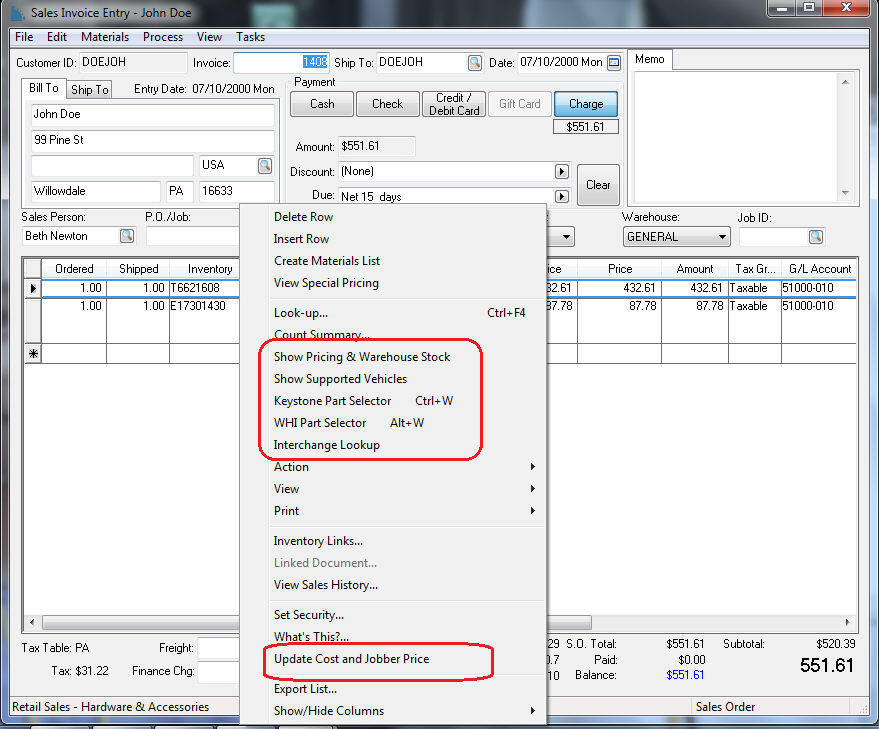
Right click on the Inventory ID of the sales order as shown below:
-
eKeystone Interface
-
Show Pricing and Warehouse Stock - Select this option to review Keystone's stock levels per warehouse. Review the Keystone Interface > Checking Keystone Stock section for more details.
-
Show Support Vehicles - Use this feature to view the vehicles compatible with a selected part. Review the Keystone Interface > Showing Support Vehicles for an Item section for more details.
-
Keystone Parts Selector - Select this option to lookup parts from eKeystone based on year, make and model. Use the convenient shortcut key of CTRL + W directly from the sales order. Review the Keystone Interface > Keystone Parts Selector section for more details.
-
Update Cost and Jobber Price - This options is used to update the inventory item's Cost and Base Price (Jobber Price) from eKeystone. The Cost and Base Price should be updated regularly using the inventory update feature within EBMS. Review the Keystone Interface > Inventory Updates section for more details.
-
WHI Solutions eCatalog Interface
-
WHI Parts Selector - Select this option to lookup parts from eKeystone based on year, make, and model. Use the convenient shortcut key of ALT + W directly from the sales order.
-
Interchange Lookup - Select this option to list parts interchange details.
Inventory Item Entry Options
The following inventory part numbers can be entered into the Inventory item ID column of the sales order.
-
Inventory Item from EBMS inventory - The most common inventory ID used is the inventory item ID entered within the EBMS inventory record. Review the Product Catalog > Entering New Inventory Items section of the Inventory documentation for more details.
-
UPC or other bar code - The code entered within the UPC Code entry of the inventory item is an alternative code that can be entered into the Inventory item ID column.
Review the Bar Codes > Entering Bar Codes within EBMS section of the sales documentation for
more details.
-
New Keystone Part - Any Keystone part that is listed withing eKeystone can be accessed by typing Keystone's part number into Inventory item ID column. The interface will access eKeystone online and automatically
create the item within the EBMS inventory list in a similar manner as the Keystone parts selector.
-
Part from Vendor Catalog - An item can be accessed from any attached vendor catalog by typing the vendor's part number into the Inventory item ID column. Review the Multi-Vendor Catalog section of the inventory documentation for more details.
Additional Sales Order Menu Options
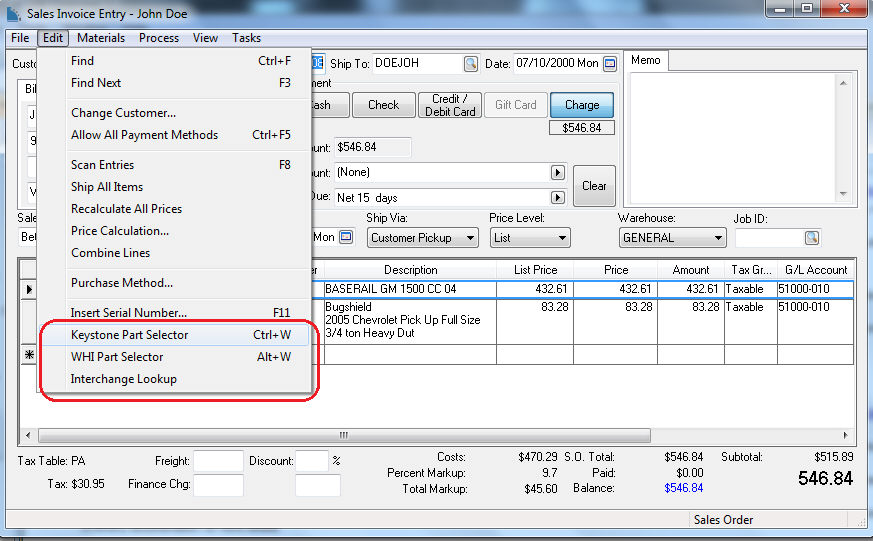
Additional options are added to the Edit and View menu's within a sales order as shown below:
-
eKeystone
-
Keystone Parts Selector - Select this option to lookup parts from eKeystone based on year, make and model. Use the convenient shortcut key of CTRL + W directly from the sales order. Review the Keystone Interface > Keystone Parts Selector section for more details.
-
Keystone Stock - Select View > Keystone Stock. Select this option to review Keystone's stock levels per warehouse. Review the Keystone Interface > Checking Keystone Stock section for more details.
-
WHI Solutions
-
WHI Part Selector - Select this option to lookup parts from eKeystone based on year, make, and model. Use the convenient shortcut key of CTRL + W directly from the sales order.
-
Interchange Lookup - Select this option to list parts interchange details.
The detail sales order lines contain the Purchase Method, Vendor, and Vendor Part Number columns. These settings are used for special order and drop shipment management.
Review the Special Orders section for more details.